TNV Inspection Division

A third party inspection is only useful when the process is clear, structured and evidence-based. Inspection is not about randomly checking a few products and writing a simple remark. A professional inspection must follow a defined process from requirement review to final reporting.

At TNV Inspection Division, we see inspection as a decision-support activity. A client does not request inspection only to “check something.” The client wants clarity before approving production, shipment, dispatch, payment, delivery, installation or acceptance.

That clarity comes from a proper inspection process.

When the process is strong, the inspection report becomes meaningful. It tells the client what was checked, which requirement was used, what was found, what evidence supports the findings, and what decision may be considered next.

TNV Inspection Division operates as a UAF-accredited inspection body under ISO/IEC 17020:2012. Our inspection approach is built around independence, impartiality, technical verification and clear reporting. That is why the inspection process is not treated as a formality. It is treated as a controlled professional activity.

What Is the Third Party Inspection Process?

The third party inspection process is the step-by-step method followed by an independent inspection body to verify products, materials, equipment, supplier facilities, production stages, packaging, quantity, documents or shipments against agreed requirements.

In simple words, the process answers these questions:

  • What needs to be inspected?
  • Where will the inspection happen?
  • Which requirement will be used?
  • What method will be followed?
  • What evidence will be recorded?
  • What should the report include?
  • What decision can the client make after inspection?

A good inspection process removes confusion. It makes the inspection objective clear for the client, supplier and inspector.

Without a clear process, inspection can become incomplete, unclear or difficult to use. With a clear process, the inspection report becomes a practical tool for business decisions.

Why the Inspection Process Matters

The inspection process matters because the value of inspection depends on how it is planned and performed.

If the inspection scope is unclear, the inspector may not check the right points. If documents are missing, the inspection may not have a proper reference. If sampling is not defined, the client may misunderstand what quantity was checked. If findings are not recorded properly, the report may not support a business decision.

A proper inspection process helps avoid these issues.

It ensures that:

  • The inspection scope is clear
  • The correct reference documents are used
  • The supplier knows what is required
  • The inspector understands the requirement
  • Findings are recorded with evidence
  • Defects are reported clearly
  • The client receives a useful inspection report
  • Corrective action or re-inspection can be planned where needed

This is why third party inspection should not be treated casually. It should follow a professional sequence.

Step 1: Understanding the Inspection Requirement

The first step in the third party inspection process is understanding the client’s requirement.

Before inspection begins, the inspection body must know what the client wants to verify. The requirement may be related to product quality, quantity, packaging, labeling, supplier readiness, production progress, material condition, documentation or final shipment approval.

At this stage, the client may share:

  • Product details
  • Supplier name and location
  • Purchase order
  • Order quantity
  • Inspection stage
  • Approved sample details
  • Drawings or specifications
  • Quality requirements
  • Packaging requirements
  • Inspection checklist
  • Shipment timeline
  • Any specific concern or previous issue

This step is important because every inspection has a purpose.

For example, a pre-shipment inspection focuses on finished goods before dispatch. A during-production inspection focuses on identifying problems while production is ongoing. A factory audit focuses on supplier capability. A vendor inspection may focus on technical items, documentation and dispatch readiness.

The inspection body must first understand the purpose before deciding how to inspect.

Step 2: Reviewing Reference Documents

Once the requirement is understood, the next step is reviewing the documents that define what must be checked.

Inspection cannot be based only on general opinion. There must be a reference.

Reference documents may include:

  • Purchase order
  • Buyer specification
  • Approved sample
  • Technical drawing
  • Product data sheet
  • Quality assurance plan
  • Inspection and test plan
  • Packing instructions
  • Labeling requirement
  • Contract requirement
  • Applicable standard
  • Previous inspection report
  • Corrective action record

These documents help the inspector understand the acceptance criteria.

For example, if a product dimension is checked, the inspector must know the required dimension and tolerance. If packaging is checked, the inspector must know the required packing method. If labeling is checked, the inspector must know the correct label format or buyer instruction.

Document review helps avoid subjective inspection. It makes the process requirement-based.

Step 3: Defining the Inspection Scope

After reviewing the requirement and documents, the inspection scope is confirmed.

The inspection scope explains exactly what will be inspected and what will not be inspected.

A clear inspection scope may define:

  • Product or material to be inspected
  • Quantity offered for inspection
  • Inspection location
  • Inspection stage
  • Sampling method
  • Checklist points
  • Documents to be reviewed
  • Tests or checks to be witnessed
  • Photographs required
  • Reporting format
  • Timeline for report submission

This step is very important.

If the scope is not clear, the client may expect one thing, the supplier may prepare another thing, and the inspector may check something else. A clear scope aligns everyone before the inspection starts.

At TNV Inspection Division, we always prefer clarity before inspection. A well-defined scope saves time, avoids confusion and improves the usefulness of the final report.

Step 4: Coordinating with the Supplier or Inspection Location

After the scope is confirmed, the inspection visit must be coordinated with the supplier, factory, warehouse, vendor or project site.

The inspection body may confirm:

  • Inspection date
  • Site address
  • Contact person
  • Product readiness
  • Quantity availability
  • Document availability
  • Safety requirements at site
  • Access requirements
  • Inspection timing
  • Any special tools or arrangements required

This coordination is necessary because inspection can only be effective when the product, material, documents and responsible personnel are available.

If goods are not ready, documents are missing or the supplier is not prepared, the inspection may be delayed or incomplete.

Professional inspection planning reduces such issues.

Step 5: Assigning a Competent Inspector

The inspection body assigns an inspector based on the product type, industry, location and technical requirement.

Not every inspector is suitable for every inspection. A textile inspection, welding inspection, engineering product inspection, electrical inspection, construction material inspection and packaging inspection may require different technical understanding.

The inspector must understand:

  • The inspection scope
  • Product or material type
  • Reference documents
  • Inspection checklist
  • Sampling requirement
  • Defect classification
  • Reporting requirement
  • Any specific client instruction

The quality of inspection depends not only on the checklist but also on the inspector’s understanding of what is being checked.

This is why inspector assignment is an important process step.

Step 6: Pre-Inspection Preparation

Before the site visit, the inspector prepares for the inspection.

This preparation may include reviewing documents, understanding product details, checking required tools, studying client instructions and preparing the inspection checklist.

Pre-inspection preparation helps the inspector arrive at the site with clarity.

The inspector may prepare for:

  • Visual inspection
  • Dimensional checks
  • Quantity verification
  • Packaging inspection
  • Labeling check
  • Document review
  • Sampling
  • Photographic evidence
  • Defect recording
  • Final reporting

This step may look simple, but it makes a big difference.

A prepared inspector knows what to check. An unprepared inspection can miss important details.

Step 7: Opening Discussion at Site

When the inspector reaches the inspection location, the inspection usually begins with an opening discussion.

This discussion may include the supplier representative, factory quality team, warehouse person, production team or site contact.

The purpose is to confirm:

  • Product availability
  • Quantity offered
  • Documents available
  • Inspection area
  • Safety instructions
  • Inspection sequence
  • Any limitation at the site
  • Contact person for support

This step helps avoid misunderstanding during inspection.

For example, if only part of the order is ready, the inspector records that only part quantity was offered. If documents are not available, this is noted. If goods are stored in multiple areas, the inspector confirms how they will be accessed.

The opening discussion sets the ground for a smooth inspection.

Step 8: Quantity Verification

Quantity verification is one of the most important inspection activities.

The inspector checks whether the quantity offered for inspection matches the order, packing list, lot details or client requirement.

Quantity verification may include:

  • Total quantity offered
  • Quantity inspected
  • Carton count
  • Unit count
  • Model-wise quantity
  • Batch-wise quantity
  • Packed quantity
  • Lot size
  • Purchase order matching
  • Packing list matching

Quantity mismatch can create serious business issues. A buyer may approve shipment assuming full quantity is ready, but actual quantity may be short. A supplier may mix models. Cartons may be incorrectly counted. Packed quantity may not match documents.

By verifying quantity, inspection helps reduce dispatch and payment disputes.

Step 9: Sampling Selection

If the inspection involves product lots, samples may be selected for detailed checking.

The sampling method depends on the inspection requirement. It may be based on AQL, lot size, buyer instruction, risk level, product type or agreed inspection plan.

Sampling selection should be clear and fair.

The inspector may select samples from different cartons, pallets, batches, production lots or storage areas to get a reasonable view of the lot condition.

Sampling is important because it defines what portion of the lot was checked. The report should clearly mention the sampling basis so the client understands the inspection coverage.

A professional inspection report should not create confusion between “quantity offered” and “quantity inspected.” Both should be clearly mentioned.

Step 10: Product Quality Inspection

Product quality inspection checks whether the product condition matches the agreed requirement.

This may include:

  • Visual appearance
  • Workmanship
  • Surface condition
  • Finishing
  • Color
  • Size
  • Dimensions
  • Weight
  • Assembly
  • Missing parts
  • Loose parts
  • Functional checks where applicable
  • Approved sample matching
  • Defect identification

This is the stage where actual product condition is verified.

For example, in consumer goods, the focus may be appearance, function, packaging and labeling. In engineering goods, the focus may be dimensions, material condition, finish, documentation and dispatch readiness. In textile products, the focus may be stitching, measurement, color, fabric condition and labeling.

The inspection method must match the product and business requirement.

Step 11: Dimensional and Functional Checks

Where required, dimensional and functional checks are performed.

Dimensional checks may include:

  • Length
  • Width
  • Height
  • Thickness
  • Diameter
  • Weight
  • Tolerance
  • Fitment-related measurements

Functional checks may include basic operation or performance checks under the agreed inspection condition.

These checks are important because many products may look acceptable but fail when measured or operated.

For technical products, dimensions and function can directly affect usability, installation, performance or buyer acceptance.

The inspector records results and highlights deviations where found.

Step 12: Packaging and Labeling Inspection

Packaging and labeling inspection is often as important as product quality.

Good products can still be damaged if packaging is weak. Correct goods can still be rejected if labeling is wrong.

Packaging inspection may include:

  • Inner packing
  • Outer carton condition
  • Carton sealing
  • Product protection
  • Moisture protection where required
  • Packing method
  • Carton strength
  • Pallet condition
  • Handling marks

Labeling inspection may include:

  • Product label
  • Barcode
  • Batch number
  • Model number
  • Warning label
  • Instruction label
  • Shipping mark
  • Buyer-specific label
  • Export marking requirement

Packaging and labeling issues are common causes of buyer complaints, shipment delays and retail rejection. This is why they must be checked before dispatch.

Step 13: Documentation Review

Depending on the inspection scope, the inspector may review required documents.

Documentation review may include:

  • Purchase order
  • Packing list
  • Material certificate
  • Test report
  • Calibration record
  • Quality record
  • Inspection and test plan
  • Approved drawing
  • Supplier declaration
  • Previous corrective action record
  • Dispatch documents

Documents are important because they support traceability and acceptance.

For many industrial and project-related inspections, the product alone is not enough. The documents must also be available and aligned with the requirement.

If documents are missing, incomplete or inconsistent, this should be clearly reported.

Step 14: Defect Identification and Classification

If defects are found during inspection, they must be recorded clearly.

Defects may include:

  • Visual defects
  • Dimensional deviations
  • Functional issues
  • Quantity shortage
  • Packaging defects
  • Labeling errors
  • Documentation gaps
  • Material condition issues
  • Workmanship problems
  • Mixed models or wrong items

Where applicable, defects may be classified based on severity.

For example:

  • Critical defects
  • Major defects
  • Minor defects

The classification depends on the product, inspection criteria and client requirement.

A professional inspection report should not hide defects or describe them vaguely. It should explain what was found, where it was found and how it affects the requirement.

Step 15: Photographic Evidence

Photographs are an important part of third party inspection reporting.

They help the client see what the inspector saw at the inspection location.

Photographs may include:

  • Product overview
  • Quantity offered
  • Sampling activity
  • Product condition
  • Defects
  • Measurements
  • Packaging
  • Labels
  • Shipping marks
  • Storage condition
  • Documents reviewed
  • Loading condition where applicable

Photographic evidence supports transparency and helps the client understand the inspection findings more clearly.

A good inspection report should use photographs to support findings, not just to decorate the report.

Step 16: Closing Discussion at Site

After completing inspection activities, the inspector may have a closing discussion with the supplier or site representative.

The purpose is to confirm major observations, clarify missing information, note limitations and ensure that important points are understood.

This does not mean the supplier can change the inspection finding. The inspector’s responsibility is to report what was found.

However, the closing discussion can help clarify facts such as:

  • Product quantity
  • Document availability
  • Defect location
  • Pending records
  • Corrective action possibilities
  • Items not offered for inspection
  • Site limitations

This supports accurate reporting.

Step 17: Inspection Report Preparation

After the site inspection, the inspector prepares the inspection report.

A proper third party inspection report should include:

  • Client details
  • Supplier details
  • Inspection location
  • Inspection date
  • Product or material description
  • Quantity offered
  • Quantity inspected
  • Sampling method
  • Reference document or standard
  • Inspection scope
  • Inspection findings
  • Defect details
  • Measurement results where applicable
  • Packaging and labeling findings
  • Documentation review notes
  • Photographs
  • Inspector remarks
  • Final conclusion

The report must be clear enough for the client to make a practical decision.

At TNV Inspection Division, we believe an inspection report should be useful, not confusing. It should tell the client what was inspected, what was found and what the findings mean.

Step 18: Report Review and Submission

Before the report is submitted, it should be reviewed for clarity, completeness and consistency.

This review helps confirm that:

  • Inspection details are correct
  • Findings are properly recorded
  • Photographs support observations
  • Defects are clearly described
  • Quantities are accurate
  • Documents reviewed are mentioned
  • Final conclusion matches the findings

Once reviewed, the report is submitted to the client within the agreed timeframe.

The client can then use the report to decide the next action.

Step 19: Client Decision

After receiving the inspection report, the client may decide to:

  • Approve shipment
  • Hold dispatch
  • Request correction
  • Reject defective goods
  • Ask for replacement
  • Arrange rework
  • Request re-inspection
  • Release payment
  • Delay acceptance
  • Review supplier performance

The inspection body provides findings. The final business decision remains with the client.

This is an important point. Third party inspection supports decision-making, but it does not replace the client’s commercial or technical decision authority.

Step 20: Corrective Action and Re-Inspection

If defects or non-conformities are found, the supplier may take corrective action.

After correction, the client may request re-inspection to verify whether the issues have been resolved.

Re-inspection may check:

  • Corrected defects
  • Reworked products
  • Repacked goods
  • Updated labels
  • Completed documents
  • Replaced quantity
  • New production lot
  • Corrective action evidence

This step is useful because it confirms whether the supplier’s correction is actually completed.

Without re-inspection, the client may not know whether the issue was properly fixed.

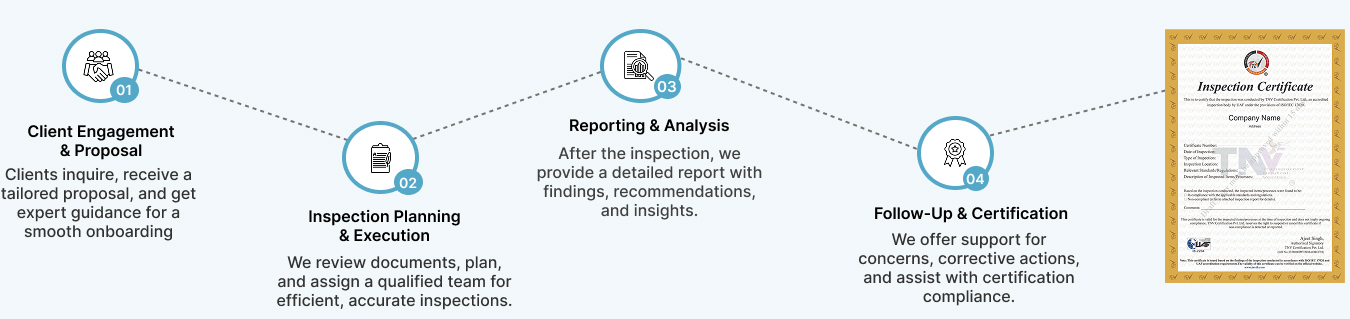
Process Flow of Third Party Inspection

Third Party Inspection Process – Professional inspector examining metal component with magnifying glass and checklist – TNV Inspection Division accredited third-party inspection services.

What Makes a Third Party Inspection Process Strong?

A strong third party inspection process has five qualities.

1. Clear Scope

The inspection must define what will be checked. Without a clear scope, the report may not answer the client’s real concern.

2. Proper Reference

Inspection must be based on agreed requirements such as purchase orders, drawings, specifications, approved samples or standards.

3. Competent Inspection

The inspector must understand the product, method and requirement.

4. Evidence-Based Reporting

Findings must be supported by observations, photographs, measurements and records.

5. Practical Conclusion

The report should help the client decide whether to approve, hold, reject, rework or request re-inspection.

How TNV Inspection Division Handles the Inspection Process

TNV Inspection Division follows a structured inspection approach for third party inspection assignments.

Our process begins with understanding the client’s requirement and inspection objective. We review available documents, confirm the inspection scope, coordinate the inspection, assign suitable inspection personnel and conduct physical verification at the inspection location.

The inspection may include product checks, material verification, quantity confirmation, dimensional checks, packaging inspection, labeling review, documentation review, supplier readiness checks or dispatch verification, depending on the agreed scope.

As a UAF-accredited inspection body operating under ISO/IEC 17020:2012, TNV Inspection Division focuses on independence, impartiality, technical verification and evidence-based reporting.

Our role is to make the actual condition clear before the client approves shipment, dispatch, delivery, installation, payment or acceptance.

Common Mistakes in the Third Party Inspection Process

Even when businesses request inspection, mistakes can reduce its value.

Requesting Inspection Too Late

If inspection is requested when shipment is already urgent, there may be no time for correction. Inspection should be planned early enough to allow action.

Not Sharing Proper Documents

Without purchase orders, specifications, drawings, approved samples or checklists, inspection becomes less precise.

Keeping the Scope Too General

A vague instruction like “check quality” is not enough. The client should define what quality points matter.

Ignoring Packaging and Labeling

Many businesses focus only on product condition, but packaging and labeling errors can also cause rejection.

Not Planning Re-Inspection

If defects are corrected, re-inspection may be needed to confirm whether the correction was completed.

Not Reviewing the Report Properly

The inspection report should be reviewed carefully. It contains information that can guide shipment, payment and supplier decisions.

When Should the Inspection Process Start?

The inspection process should start before the goods are ready for final decision.

For high-risk orders, planning should begin at the order stage. For production orders, inspection may be planned before production, during production or before shipment. For project materials, inspection should be aligned with vendor schedules and dispatch timelines.

The earlier the process is planned, the better the control.

A late inspection can still help, but it may reduce the time available for correction.

Final Summary

The third party inspection process is a structured method used to verify products, materials, suppliers, documents or shipments before important business decisions are made.

A proper process starts with understanding the requirement, reviewing documents, defining the scope, assigning a competent inspector, conducting physical inspection, recording findings, preparing the report and supporting corrective action or re-inspection where required.

At TNV Inspection Division, we treat inspection as a professional verification activity, not a casual check. The goal is to help clients move from assumption to evidence and from uncertainty to informed decision-making.

When inspection is performed through a clear process, it gives businesses confidence before production, shipment, dispatch, delivery, installation or acceptance.

Frequently Asked Questions(FAQ)

What is the third party inspection process?
The third party inspection process is a structured method followed by an independent inspection body to verify products, materials, supplier facilities, documents or shipments against agreed requirements. It usually includes requirement review, scope confirmation, site inspection, findings documentation and report submission.
What is the first step in third party inspection?
The first step is understanding the inspection requirement. The client shares product details, supplier location, order quantity, inspection stage, specifications, drawings, approved samples and timeline so the inspection body can define the correct inspection approach.
What documents are needed for third party inspection?
Common documents include purchase orders, buyer specifications, approved samples, technical drawings, packing instructions, inspection checklists, quality assurance plans, material certificates, test reports and any applicable standard or project requirement.
What happens during on-site inspection?
During on-site inspection, the inspector physically checks products, materials, quantity, packaging, labeling, dimensions, documents or supplier readiness depending on the agreed scope. Findings are recorded with observations, photographs and measurements where applicable.
What happens after the inspection report is issued?
After the report is issued, the client reviews the findings and decides whether to approve shipment, hold dispatch, request correction, reject the goods, arrange rework, release payment or request re-inspection after corrective action.

Need a Clear Third Party Inspection Process for Your Supplier or Shipment?

Do not approve shipment, dispatch, delivery or payment only on supplier confirmation.

TNV Inspection Division can help you plan and conduct third party inspection through a structured process, from requirement review to final inspection reporting.

Share your product details, supplier location, inspection stage, order quantity, specifications and timeline with our team. We will review your requirement and guide you on the right inspection approach.

© 2026 All Rights Reserved. TNV Certification